


Raylib Golang: Go Game Engine Overview
If you want to use a simple 3D Go game engine without all the hassle, or adopting a heavy editor, raylib-go is the pragmatic path. It’s the Go binding around the C library raylib, giving you immediate-mode graphics, input, audio, and a fast compile/run loop. You write plain Go, call drawing functions, and get pixels on screen—no GUI tooling, no scene editor. That’s why many golang devs gravitate to raylib golang for small 2D/3D prototypes and teaching projects.
This article walks through a minimal 3D “hello cube” in raylib-go, explains the API pitfalls you’ll hit when skimming older snippets, and shows how to fix them (e.g., Projection vs Type, and using Go’s math instead of imagined helpers). We also include a compact comparison of libraries people consider when searching for a Golang game engine. If you just need working raylib examples, using the go raylib/raylib go bindings, then look no further.
What are raylib 3D Games and its Go bindings?
Raylib is a C library for building 3D games and visualizations: one header, immediate-mode style, minimal ceremony. It ships lots of small, focused raylib examples that teach concepts incrementally. raylib-go exposes these APIs to Go with minimal ceremony: no editor, just code.
raylib-go Go Bindings for RayLib?
gen2brain/raylib-go are high-level Go bindings that use the raylib library under the hood. It’s idiomatic enough for Go users, and keeps you close to the metal without having to use a proprietary GUI interface or editor. If you want “just code”, and iterate quickly (simple window, draw calls, camera, input), then this is it. It also plays fine with a basic 3D (XYZ) Cartesian coordinate system.
Go Game Engine Comparison
Source: https://awesome-go.com/game-development/
| Framework/Library | LLM Knows Best | Maintained & Supported | 3D Support |
|---|---|---|---|
| raylib-go (bindings) | High | High | ✅ Basic 3D |
| Ebitengine (2D) | High | High | ❌ |
| Pixel (2D) | Medium | Medium | ❌ |
| Oak (2D) | Medium | Medium | ❌ |
| engo (2D ECS) | Medium | Low | ❌ |
| g3n (3D) | Medium | Low/Medium | ✅ Full 3D |
| go-sdl2 (bindings) | Medium | High | ⚠️ Possible, low-level |
| go3d (math) | Medium | High | ✅ Math only |
| raylib-go + go3d (combo) | High | High | ✅ Basic 3D |
| Harfang3D (Go) | Low | Medium | ✅ Full 3D |
| termloop (terminal) | Medium | Low | ❌ |
| Ark/ecs (ECS libs) | Medium | Medium | ❌ |
| grid / tile / go-astar (utils) | Medium | High | ❌ |
raylib-go is a popular choice, and strikes the right balance between simplicity, easy-of-use, and support. It’s a small, dependency-light way to get a 3D window up in Go without a lot of overhead.
Create a Go Project and Install Dependencies
Raylib itself is a C library. You need the native library installed first, then the Go bindings.
Install raylib on Linux
The following example installs libraylib-dev1 on a Debian/Ubuntu flavor of Linux:
sudo apt-get update
sudo apt-get install build-essential git pkg-config cmake
sudo apt-get install libraylib-dev
Install raylib on macOS
Use Homebrew on macOS to install raylib:
brew install cmake pkg-config
brew install raylib
If
pkg-configcan’t find raylib on Apple Silicon, try:export PKG_CONFIG_PATH="/opt/homebrew/lib/pkgconfig"
Install raylib on Windows
On Windows you can download MSYS2 and then use shell to install it:
pacman -S mingw-w64-x86_64-gcc mingw-w64-x86_64-raylibGolang Init (go mod init) Example
Assuming you already have a repo checked out, or a directory created, go into it and run go mod init to initialize a Go module:
cd path/to/your-repo-dir
go mod init github.com/yourname/yourgame
Install the raylib-go Bindings for raylib
go get github.com/gen2brain/raylib-go/raylibThis will pull down the Go bindings.
Go Game Examples: Raylib Golang
Below is the final working example, followed by a tight walkthrough and an honest post-mortem on the mistakes (API drift, math helpers, and camera usage).
Open a code editor and add the following to the main.go file in the root of your Go project to get the “3D Hello Cube” example working:
package main
import (
"math"
rl "github.com/gen2brain/raylib-go/raylib"
)
func main() {
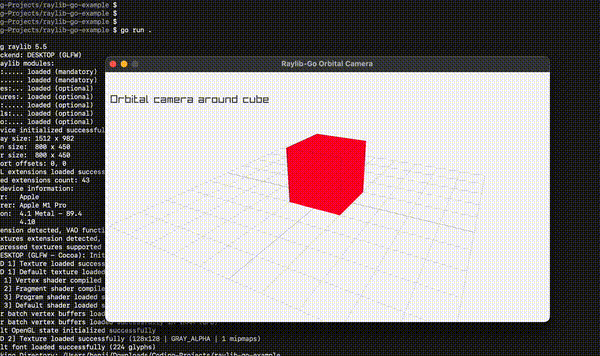
rl.InitWindow(800, 450, "Raylib-Go Orbital Camera")
defer rl.CloseWindow()
camera := rl.Camera3D{
Position: rl.NewVector3(10.0, 10.0, 10.0),
Target: rl.NewVector3(0.0, 0.0, 0.0),
Up: rl.NewVector3(0.0, 1.0, 0.0),
Fovy: 45.0,
Projection: rl.CameraPerspective,
}
rl.SetTargetFPS(60)
for !rl.WindowShouldClose() {
// Orbit the camera using Go's math trig (radians)
angle := float64(rl.GetTime()) * 0.5
radius := 10.0
camera.Position.X = float32(radius * math.Cos(angle))
camera.Position.Z = float32(radius * math.Sin(angle))
camera.Position.Y = 5.0
rl.BeginDrawing()
rl.ClearBackground(rl.RayWhite)
rl.BeginMode3D(camera)
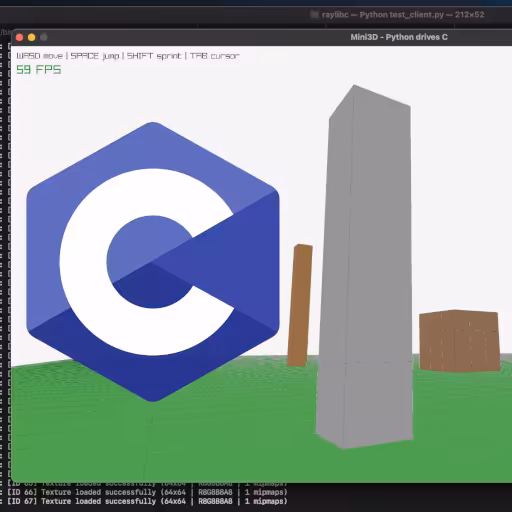
rl.DrawCube(rl.NewVector3(0, 1, 0), 2, 2, 2, rl.Red)
rl.DrawCubeWires(rl.NewVector3(0, 1, 0), 2, 2, 2, rl.Maroon)
rl.DrawGrid(10, 1.0)
rl.EndMode3D()
rl.DrawText("Orbital camera around cube", 10, 40, 20, rl.DarkGray)
rl.EndDrawing()
}
}Finally, run the code with the go run main.go command.
Check out my Github repo for the latest iteration of this example.
What Each Part of the raylib-go Code Does
InitWindow/CloseWindow: open/close the native window and GL context (the usual go-raylib boot sequence).Camera3D{ ... Projection: rl.CameraPerspective }: choose a perspective camera (vs orthographic). This sets how the scene projects to the screen, not how the camera moves.- Main loop:
for !rl.WindowShouldClose()is the render/update loop. One loop. Don’t start a second one. - Orbital motion: use Go’s
mathtrig to move the camera in a circle (X/Z) and keep Y slightly elevated.rl.GetTime()returns seconds since start; multiply to control speed. BeginDrawing/EndDrawing: frame boundary for 2D.BeginMode3D(camera)/EndMode3D(): frame boundary for 3D drawing.DrawCube+DrawCubeWires: the visible cube. Encloses 3D drawing, and sets it at(0,1,0)so it doesn’t z-”fight” with the grid at Y=0.DrawGrid: ground reference, helpful when testing controls or camera transforms.
What Went Wrong (and Why): API Drift & Mistakes Made
These are the exact mistakes that tripped us—useful if you’re scanning raylib github issues, older raylib examples, or cross-porting code to raylib golang.
-
Two render loops I originally wrote a 2D loop and a second “3D loop.” The first loop never exits, so the second never runs. Raylib expects one main loop managing both 2D and 3D phases.
-
Camera3D.TypevsCamera3D.ProjectionOlder materials refer tocamera.Typewith values likeCameraPerspective. In newer raylib and go raylib bindings, the struct field isProjection(rl.CameraPerspectiveorrl.CameraOrthographic). Projection == how the camera projects. It is not a movement mode. -
Confusing camera projection with camera mode I mixed up projection with “orbital/first-person” movement modes. Even if your binding exposes
SetCameraMode/CameraMode, projection still just sets perspective vs ortho. For movement, either:- call the appropriate mode helpers if your version exposes them, or
- do it yourself (as shown) by updating
camera.Position/camera.Targeteach frame.
-
Using
rl.Cos/rl.Sininstead of Go’smathIn C you’ll often see raymath helpers. In raylib-go, use the standard library:import "math"→math.Cos,math.Sin, etc. If you want a handy reference for vector/matrix calls (useful when mapping APIs), the Raylib Raymath Cheatsheet is here: https://www.raylib.com/cheatsheet/raymath_cheatsheet.html Just remember: that sheet is C-centric; in Go you’ll reach formathplus the vector constructors from the bindings. -
Clipping the cube into the grid Rendering the cube centered at the origin with size 2 can intersect the ground plane (Y=0). Nudge to
(0,1,0)or raise the camera so your first frame actually shows geometry. -
Passing the wrong thing to the wrong field I tried
Projection: rl.CameraOrbital. Wrong type entirely—CameraOrbital(if available) is a mode, not a projection. The compiler was right to complain.
Raylib 4→5 Notes (API drift you’ll notice)
Raylib 5.x tightened a few APIs and examples (C side), e.g., typed compound literals and minor enum/struct cleanups. If you’re porting from older tutorials or random gists, expect small diffs. Follow the community tracking: https://github.com/raysan5/raylib/issues/5121
Practical guidance for go raylib users:
- Prefer Go’s
mathfor scalars/trig; userl.NewVector3etc. for vectors. - Compare signatures against current raylib-go repo: https://github.com/gen2brain/raylib-go.
- If a field/mode from a blog post doesn’t exist, it probably moved or was renamed (e.g.,
Type→Projection). Implement motion manually if unsure.
Raylib 5.x Note (API changes)
Raylib 5.x introduces additional API cleanups and minor breaking changes compared to 4.x. If you copy C examples straight into Go, expect small diffs—especially around typed compound literals and camera helpers. There’s a community thread tracking 5.x updates and example migrations here: https://github.com/raysan5/raylib/issues/5121
If you see advice like “remove parentheses around (Vector3)” or updates to example code, that’s about C syntax changes. In raylib-go, most of this translates to “construct with helpers like rl.NewVector3 and stick to Go’s math for trig.” When in doubt, compare against current raylib-go examples and signatures.
Conclusion
If you want a golang game engine feel without the engine weight, raylib-go is the pragmatic path: small surface area, fast compile-run loop, and enough 3D to prototype. The main traps come from API drift: camera.Projection (not Type), a single render loop, and using Go’s math rather than imagined rl.Sin/Cos. The raylib cheatsheet clarifies math concepts, while the raylib github (and raylib-go repo) show the current signatures.
Moving from Raylib 4 to 5 is mostly minor; if a helper or field vanished, implement the movement yourself and keep drawing. With the final example above, you’ve got a clean raylib examples baseline in go raylib/raylib go bindings—extend it with WASD/mouse look, lights, or meshes without fighting the toolchain.
References & Further Reading
- raylib-go (Go bindings / examples / issues): https://github.com/gen2brain/raylib-go
- Raylib Raymath Cheatsheet (useful to map concepts while you code in Go): https://www.raylib.com/cheatsheet/raymath_cheatsheet.html
- Raylib 5.x tracking issue: https://github.com/raysan5/raylib/issues/5121