


How to Register a Domain with a Search Engine (Step-by-Step Guide)
When you launch a new website, one of the most important steps is making sure search engines know it exists. Registering your domain with Google, Microsoft Bing, and other search engines helps ensure your pages get indexed quickly and show up in search results. The process usually involves verifying ownership of your domain name and submitting a sitemap, but the exact steps vary depending on the platform.
If you’ve ever wondered about domain name search engine registration, this guide walks you through the most important services and explains how to handle DNS records so your site is recognized as the official source.
Why Registering Your Domain with Search Engines Improves SEO
Search engines are constantly crawling the web, but they don’t automatically know about every new site. By proactively registering your domain with major search engines, you speed up discovery and give them verified information about your website. That has several direct SEO benefits:
- Faster indexing — Submitting your domain and sitemap means your pages are crawled and added to the index sooner than if the engine had to stumble upon them through backlinks.
- Stronger trust signals — Verification through DNS records, HTML files, or meta tags proves you own the site. Search engines treat verified domains more reliably when processing sitemaps and structured data.
- Better crawl efficiency — When you provide a sitemap, search engines focus their resources on the URLs you care about most, instead of guessing from internal links alone.
- Visibility across ecosystems — Bing powers Yahoo, DuckDuckGo, and Ecosia; IndexNow notifies Bing, Yandex, Naver, Seznam, and Yep. Registering once can increase reach across multiple platforms.
- Diagnostic insights — Webmaster tools from Google, Bing, and others show coverage errors, Core Web Vitals, and backlink data. Fixing issues highlighted there directly improves technical SEO.
In short, registering your domain with search engines doesn’t just help your site get noticed faster—it also gives you the monitoring tools to continually improve your SEO performance.
How to Use Google Search Console
Here’s the fast, no-nonsense way to set up and actually use Google Search Console (GSC)—including the only DNS you should touch.
Visit the Google Search Console login, and sign in with your Google account.
1) Create the Right Property + Verify (TXT at Your Registrar)
Pick “Domain property” (recommended). It captures all protocols and subdomains (http/https, www, app., etc.). GSC will show you a TXT value like google-site-verification=.... Add one DNS TXT at your apex (root) and verify. You do not need to change A/AAAA/CNAME for GSC. (Google Help)
DNS example (generic zone)
@ TXT "google-site-verification=PASTE_GOOGLE_CODE"NOTE: A TTL of 300-3600 seconds is typically fine while setting up.
Then confirm it’s live:
dig +short TXT example.com- or
nslookup -type=TXT example.com
Alternative (only if you insist on URL-prefix properties): upload an HTML file, add a meta tag, or use GA/gtag linkage. Domain properties still require DNS TXT. (Google Help)
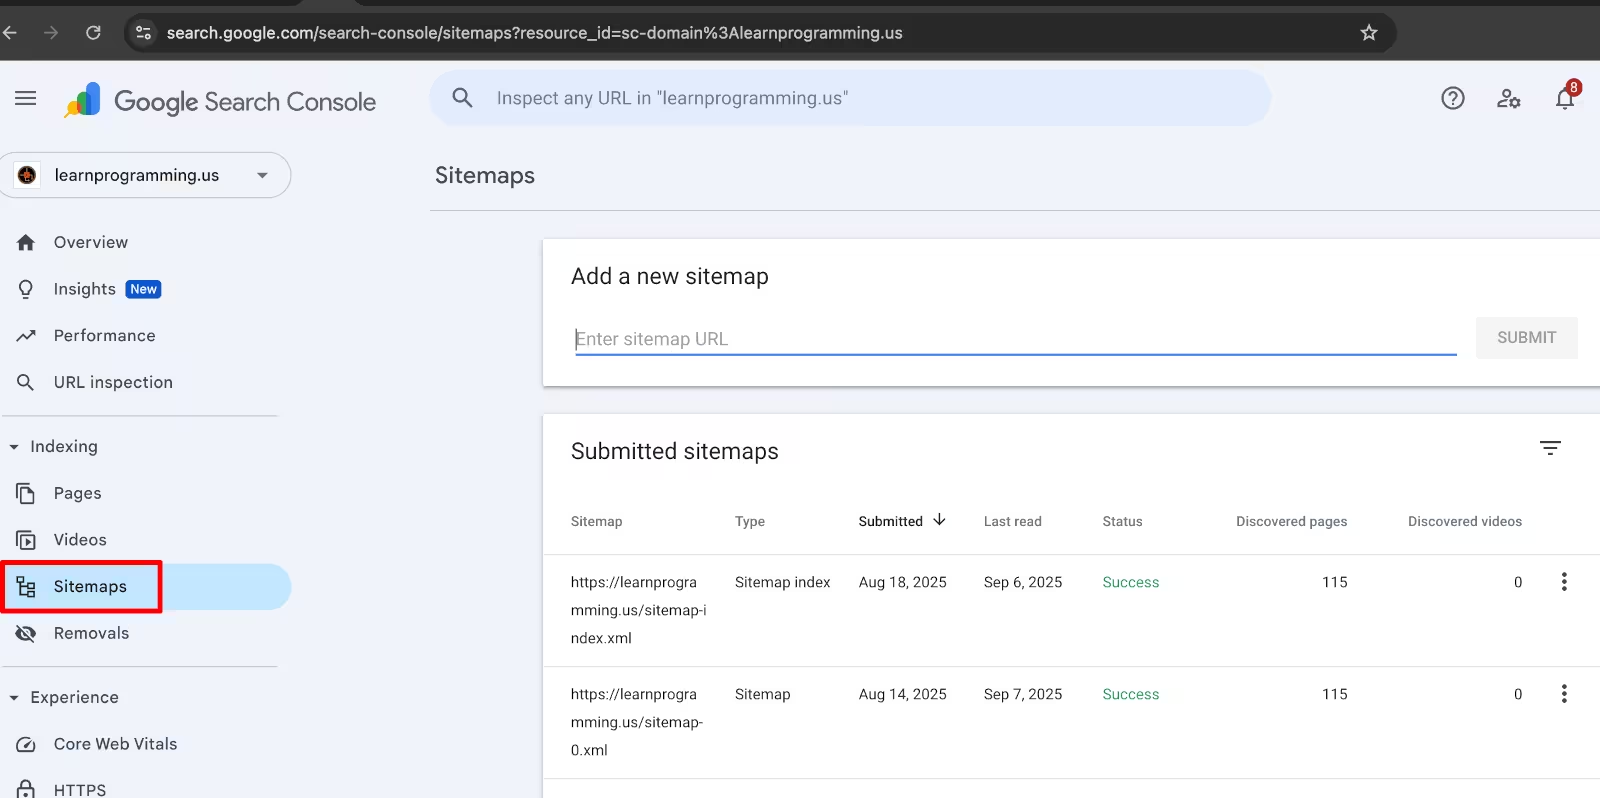
2) Submit Your Sitemap
Expose https://example.com/sitemap.xml, then submit it in Index → Sitemaps (or list it in robots.txt). Treat sitemaps as a hint, not a guarantee. (Google for Developers, Google Help)
Robots snippet
User-agent: *
Disallow:

Sitemap: https://example.com/sitemap.xml
3) Core Day-to-Day Workflow (What You’ll Actually Use)
A) Diagnose/Fix Indexing Per Page
- Use URL Inspection for any URL: see Google’s indexed version, indexability, structured data, and request (re)indexing after fixes. There’s a quota—don’t spam it. (Google Help, Google for Developers)
B) Audit Coverage at Scale
- Open Index → Pages (Page indexing) to see why pages are Not indexed (e.g.,
noindex, “Crawled—currently not indexed”, canonicalized elsewhere, blocked by robots, etc.). Work from the status buckets and sample URLs. (Google Help)
C) Measure Performance and Prioritize
- Performance (Search results) shows queries, pages, CTR, positions, devices, countries, and date comparisons. Filter to a page, find queries with high impressions/low CTR, and fix titles/snippets. (Google Help)
D) Monitor Real-User Speed
- Core Web Vitals (mobile + desktop) uses field data. Fix “Poor/Needs improvement” groups, then re-check trends. (Google Help, Google for Developers)
E) HTTPS Sanity Check
- HTTPS report flags reasons pages aren’t served over HTTPS (mixed content, cert issues). (Google Help, Google for Developers)
F) Remove Something Fast (Temporary)
- Index → Removals can hide a URL for ~6 months and clear cached snippets while you fix the root cause. (Google Help, Google for Developers)
G) Backlinks
- Links shows top linking sites and pages. Use it to spot acquisition opportunities and toxic patterns (then fix on the web, not in GSC). (Google Help)
4) Minimal Google Search Console Checklist (15 Minutes)
- Add Domain property → add TXT at registrar → Verify. (Google Help)
- Ensure
httpscanonical is live; sitemap reachable. - Submit sitemap in Sitemaps. (Google Help)
- Inspect your homepage (URL Inspection) → Request indexing once. (Google for Developers)
- In Pages, fix the biggest “Not indexed” buckets first. (Google Help)
- In Performance, filter by last 28 days, sort queries by Impressions, improve low-CTR titles/snippets. (Google Help)
- Check Core Web Vitals; prioritize mobile issues. (Google Help)
5) Common Pitfalls (Avoid These)
- Touching A/AAAA for verification — unnecessary. Only add a TXT record for Domain properties. Your A/AAAA are for routing/hosting, not GSC. (Google Help)
- Adding only a URL-prefix property — you’ll miss subdomains/protocols. Use Domain property unless you purposely want a narrow slice. (Google Help)
- Overusing “Request indexing” — it’s rate-limited; fix sitewide issues (sitemap, internal links, canonicals) instead. (Google for Developers)
- Expecting instant data — some reports take time to populate after verification; that’s normal. (Google)
- Misusing Indexing API — it’s only for JobPosting and livestream pages. Not for blogs/docs/e-com. (Google for Developers)
Quick Roles & Sharing
If you’re collaborating, add users in Settings → Users and permissions (Owner/Full/Restricted). Only owners can add others. (Google Help)
Import Your Domain into Bing (Google Search Console → Bing Webmaster Tools)
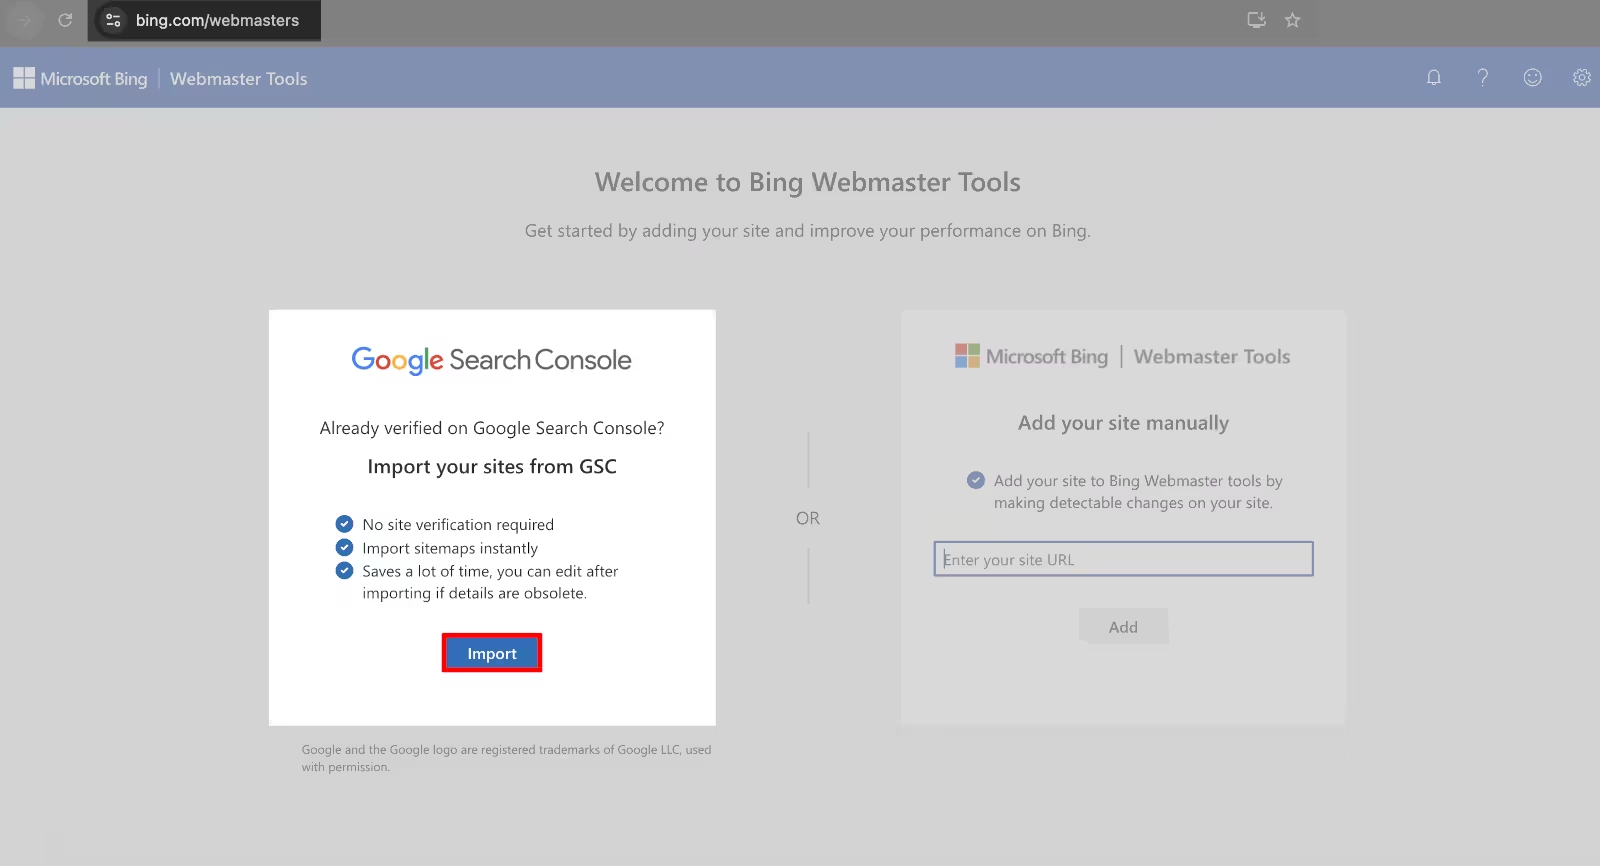
One of the easiest ways to get started with Bing is to import your existing site data directly from Google Search Console. If you’ve already registered and verified your domain with Google, Bing can pull that information in with a single click.
This import does three things automatically:
- Skips site verification — since Google already proved you own the domain.
- Usually imports sitemaps — no need to resubmit them manually. Verify and submit manually if it doesn’t
- Saves time — Bing starts crawling your site right away, using the same settings you’ve already configured in GSC.
Because of this, it’s a best practice to set up Google Search Console first, and then use Bing’s import feature. That way, you avoid doing duplicate DNS verification and sitemap submissions. It’s faster, cleaner, and ensures both search engines are working from the same information about your site.
Register Domain with Search Engines (Non-Google)
Let’s move on to other non-Google search engines that you should register your domain with.
Prioritize Bing Webmaster Tools + IndexNow, which will cover Bing and most Bing-powered engines (Yahoo, Ecosia, sometimes DuckDuckGo), and IndexNow pings other non-Google engines (Yandex, Naver, Seznam, Yep). Then add regionals you actually care about (Yandex, Naver, Baidu, Seznam). Brave, DuckDuckGo, and Mojeek don’t have real webmaster consoles—see notes below.
- Microsoft Bing Webmaster Tools (BWT) — highest ROI, powers Yahoo; DDG largely sources from Bing. (Search - Microsoft Bing, Search Engine Journal, DuckDuckGo)
- Yandex Webmaster — Russia/CIS. (Yandex)
- Naver Search Advisor — South Korea. (InterAd Korea, The Egg)
- Baidu Zhanzhang (Webmaster Tools) — Mainland China. (Dragon Metrics, The Egg)
- Seznam Webmaster — Czech Republic. Supports file/meta verification and mentions IndexNow. (O Seznamu)
- IndexNow (protocol, not a console) — instantly notifies Bing, Yandex, Naver, Seznam, Yep. (indexnow.org)
Domain Name Search Engine Registration Steps
1) Bing Webmaster Tools
-
Go to webmaster.bing.com, add your site (you can import from GSC).
-
Verify ownership (pick one):
- DNS CNAME: BWT gives a host like
xxxxxxxx.yourdomain.com→ point it toverify.bing.com. Then click Verify. (Search - Microsoft Bing, Squarespace Help) - DNS TXT, meta tag, or BingSiteAuth.xml are also supported. (Impression, Kinsta)
- DNS CNAME: BWT gives a host like
-
Submit sitemap(s) in BWT.
-
Enable/use IndexNow: generate key, host the key file at your root, and submit changed URLs; verify delivery in BWT. (Search - Microsoft Bing)
Registering in Bing also gives you visibility in Yahoo and often helps with DuckDuckGo. (Search Engine Journal, DuckDuckGo)
2) Yandex Webmaster
- Sign in at webmaster.yandex.com, add your host.
- Verify via DNS TXT (
yandex-verification: <code>), meta tag, or HTML file. (Yandex) - Submit your sitemap in Yandex Webmaster.
3) Naver Search Advisor (a.k.a. Naver Webmaster Tools)
- Go to searchadvisor.naver.com, add site.
- Verify with meta tag or HTML file. (The Egg)
- Submit one XML sitemap (Naver accepts a single sitemap URL). (The Egg)
4) Baidu Zhanzhang (Baidu Webmaster Tools)
- Create a Baidu account, open the Zhanzhang portal, add site.
- Verify via HTML file, meta tag, or CNAME per Baidu’s instructions. (The Egg, Dragon Metrics)
- Submit sitemap; optionally use Baidu’s URL push features for faster crawling (available inside Zhanzhang). (Dragon Metrics)
5) Seznam Webmaster
- Add site in Seznam Webmaster (o-seznam.cz).
- Verify by placing a file like
/seznam-wmt-<code>.txtat your root or via a head meta tag. (O Seznamu) - Submit via their add form; Seznam also mentions IndexNow as an option to add pages. (O Seznamu)
DNS at Your Domain Registrar: A/AAAA, CNAME, and Verification Records
You’ll do two kinds of DNS work:
A) Point the Domain to Your Server (One-Time)
Add records in your DNS zone (values = your actual server IPs):
@      A      203.0.113.10         ; apex → your IPv4
@      AAAA   2001:db8::1234       ; apex → your IPv6 (if you have one)
www    CNAME  @                    ; www → apex
*      CNAME  @                    ; wildcard subdomains → apex (if you use them)
Notes
- The apex (@) cannot be a CNAME at most registrars; use A/AAAA there.
- Keep TTL modest (e.g., 300—3600s) while iterating; raise later.
- Set your web server to 301 canonicalize (choose
https://example.comorhttps://www.example.com). - Ensure valid TLS (Let’s Encrypt) on all hosts you expose.
B) Add Verification Records (Safe; They Don’t Affect Routing)
Each console gives you a code. You add TXT (or CNAME/file/meta) and click Verify.
Examples (replace values with what each tool shows):
-
Bing (DNS CNAME method)
<long-code>.yourdomain.com. CNAME verify.bing.com.→ then Verify in BWT. (Squarespace Help) -
Bing (DNS TXT method)
@ TXT "MS=<bing-code>"→ Verify. (Impression) -
Yandex (DNS TXT method)
@ TXT "yandex-verification: <code>"→ Verify. (Yandex) -
Naver Use meta tag or HTML file verification inside Search Advisor. (The Egg)
-
Baidu Use HTML file / meta tag (or CNAME if prompted). (The Egg)
-
Seznam Upload
seznam-wmt-<code>.txtat site root or add<meta name="seznam-wmt" content="<code>" />. (O Seznamu)
IndexNow (Strongly Recommended)
This is a simple “notify-on-change” protocol many non-Google engines honor.
- Generate a key and host the key file at your site root.
- Ping an IndexNow endpoint with changed URLs (manually or via your CMS).
- Use Bing WMT to confirm URLs were received. (Search - Microsoft Bing)
Supported engines include Bing, Yandex, Naver, Seznam, Yep. (indexnow.org)
Sitemaps & Robots.txt (Apply Everywhere)
- Make sure
https://example.com/sitemap.xmlis live and contains only canonical, indexable URLs. - Reference it in robots.txt:
User-agent: *
Disallow:

Sitemap: https://example.com/sitemap.xml
Then submit that sitemap in each console.
DNS Management Section Across Registrars (With Links & Notes)
| Registrar | Section Name / Path | Documentation Link | Notes |
|---|---|---|---|
| Namecheap | Advanced DNS tab | Namecheap DNS setup guide | Clear, table-style UI. |
| GoDaddy | Manage DNS or DNS Zone File under domain settings | Manage DNS records – GoDaddy Help | Standard controls for A, CNAME, TXT, etc. |
| Squarespace (formerly Google Domains) | DNS tab in domain dashboard (click domain → DNS in side panel) | Accessing Squarespace-managed domain DNS | Now the host for Google Domains DNS; has Add Preset for common setups. |
| Cloudflare | DNS → Records in your site’s dashboard | Cloudflare – how to manage DNS records | Advanced UI; supports proxied vs DNS-only setting. |
| Hover | DNS section via domain overview → “Add a record” | Managing DNS records – Hover support | Clean and minimalist interface. |
| Dynadot | My Domains → select domain → Action → DNS Settings | Dynadot DNS setup guide | Allows A, AAAA, TXT, CNAME, SRV; follow their “Host” guidance (sometimes not ”@” literally). |
| Name.com | My Domains → select domain → Manage DNS Records | Adding DNS records and templates – Name.com support | Basic UI with templates and an “advanced” view. |
| Bluehost | Domains → select domain → Zone Editor or DNS tab | How to manage DNS records – Bluehost | cPanel-style UI or newer Account Manager; also import/export zone. |
| DreamHost | Manage Websites → DNS Settings or domain DNS tab | Adding custom DNS records – DreamHost; see also Configuring DNS for your domains | Simple panel; default TTL is short (≈5m) so changes propagate quickly. |
| HostGator | Domains → Zone Editor / cPanel → Manage | Change DNS Zones – HostGator | Classic cPanel interface; supports zone import/export. |
Example: Namecheap DNS Configuration
If your domain is registered with Namecheap, you can configure DNS records directly in their dashboard. Start by signing in to Namecheap and opening the Domain List. From there, click Manage next to the domain you want to update.
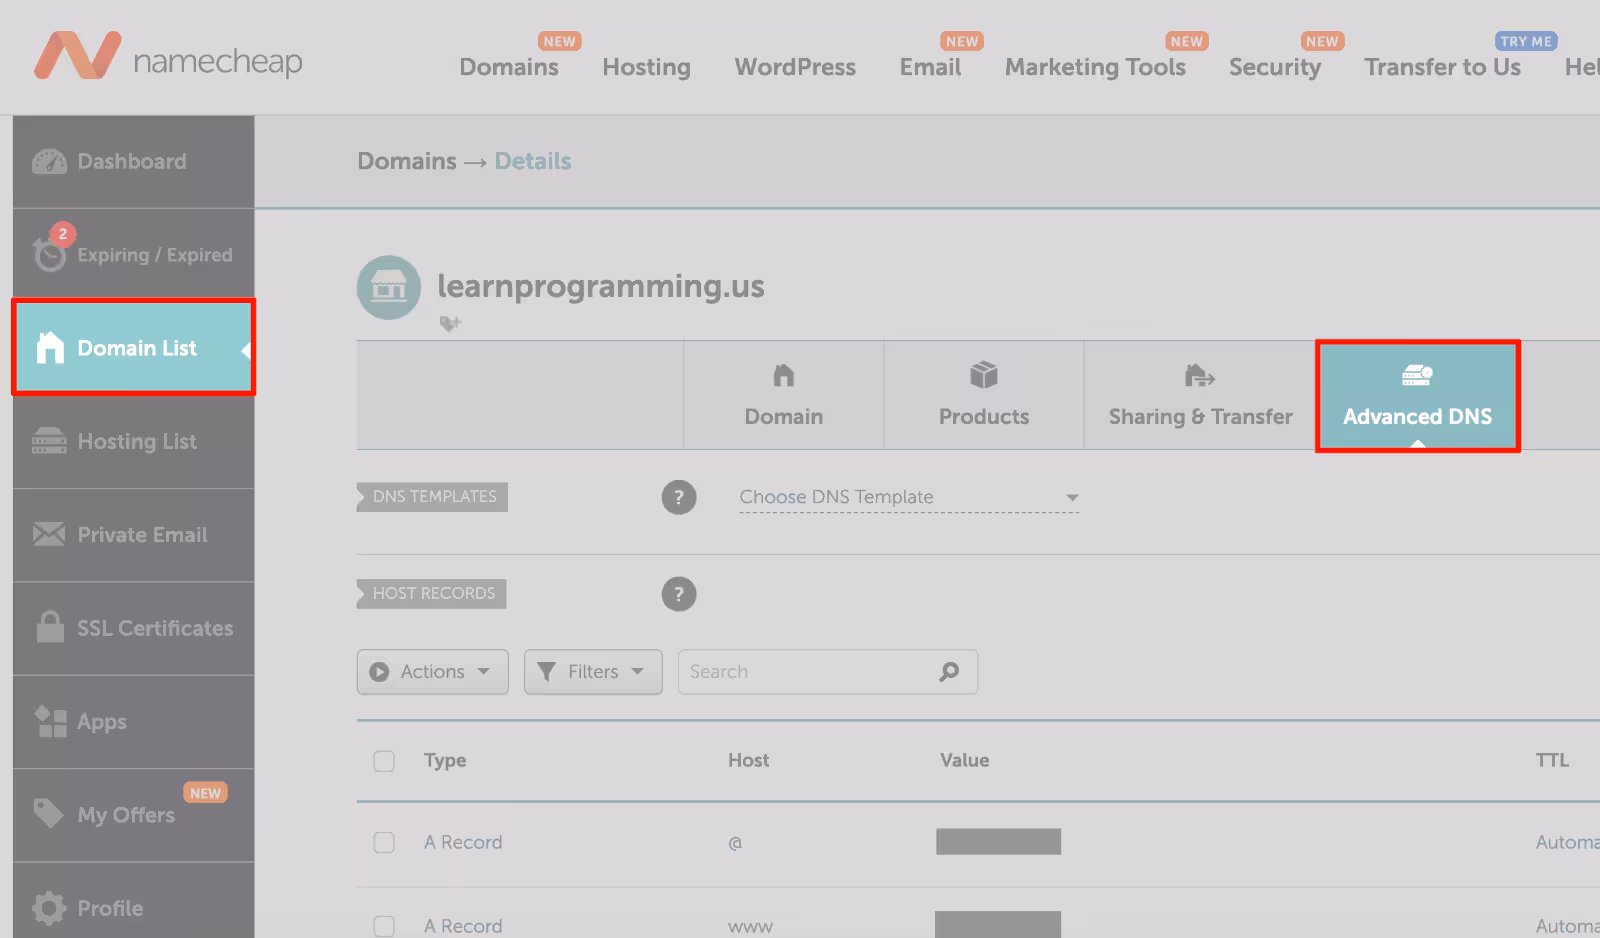
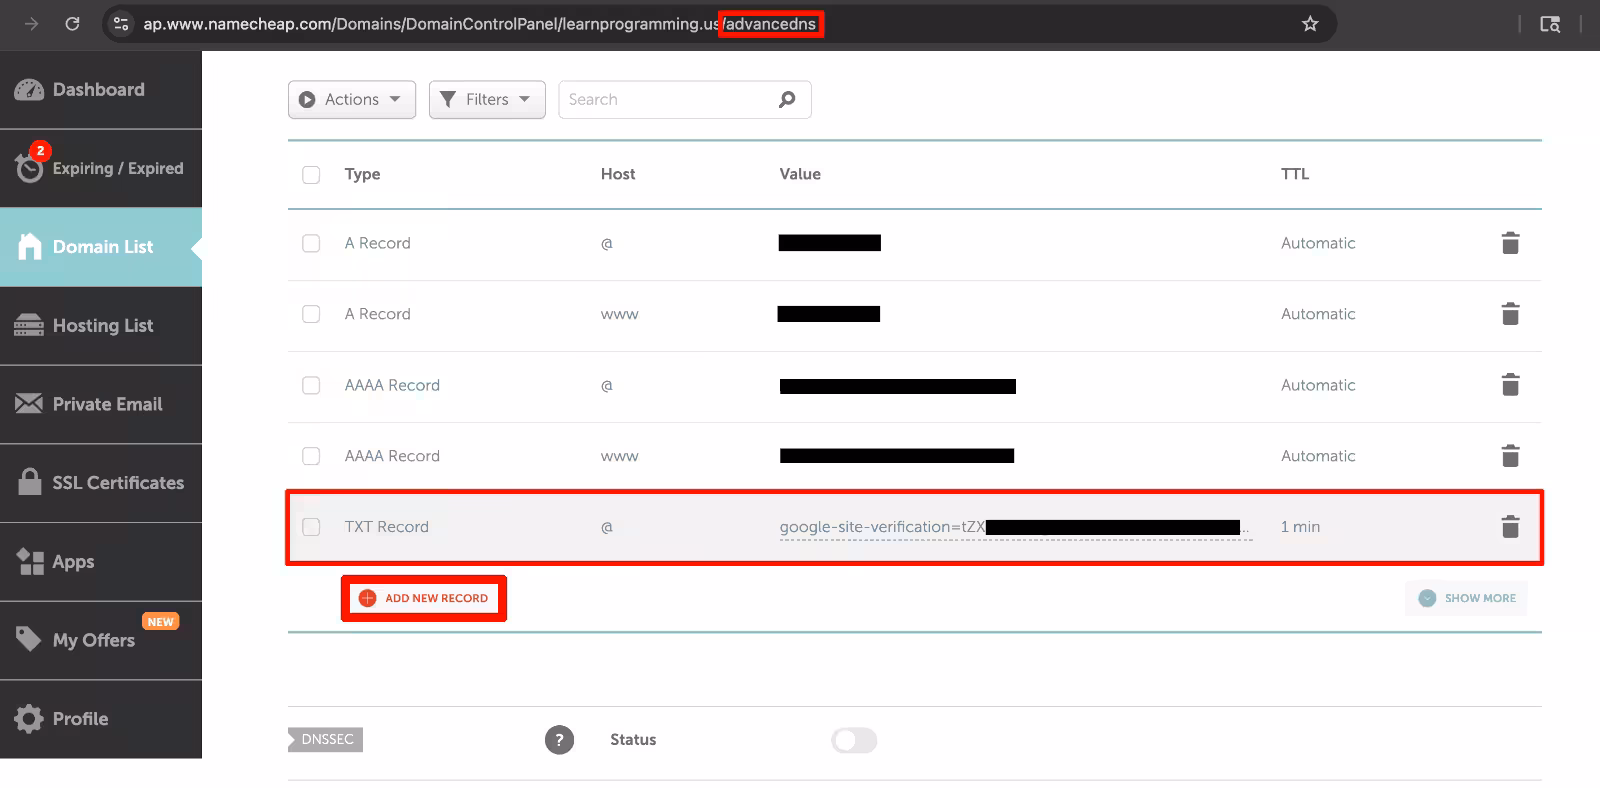
Inside the management screen, switch to the Advanced DNS tab. This is where you’ll find your existing records and where you can add new ones. To complete a verification or register your domain with a search engine, simply add a new TXT record with the value provided by Google Search Console, Bing Webmaster Tools, or another service.
Adjusting the Namecheap DNS configuration is straightforward once you know where the controls live, and it’s the same place you’ll return to whenever you need to update, remove, or add DNS records.
FYI on Engines Without Consoles
- DuckDuckGo — largely uses Bing; no manual submission. (DuckDuckGo)
- Brave Search — no submission; indexing partly via the Web Discovery Project (user-opt-in telemetry). You can’t “register,” just make sure your site is crawlable. (Brave Help Center)
- Apple (Applebot) — follow Apple’s crawler guidelines; no console. (Apple Support)
- Mojeek — independent index; no manual submission; discover via links. (Mojeek Blog)
Build and Submit Your Sitemap (Once, Everywhere)
A sitemap is just an XML list of canonical, indexable URLs. Create it once, host it at /sitemap.xml, reference it in robots.txt, then submit the same URL in each console.
Rules that actually matter
- Only 200/OK, canonical URLs; no redirects,
noindex, or parameter spam. - Include
<lastmod>(ISO 8601).changefreq/priorityare largely ignored. - If you have >50,000 URLs or >50 MB (uncompressed), use a sitemap index and split files; gzip is fine.
- Keep it HTTPS and publicly fetchable (200, correct
Content-Type).
Minimal examples
sitemap.xml
<?xml version="1.0" encoding="UTF-8"?>
<urlset xmlns="http://www.sitemaps.org/schemas/sitemap/0.9">
  <url>
    <loc>https://example.com/</loc>
    <lastmod>2025-09-10</lastmod>
  </url>
</urlset>
sitemap_index.xml
<?xml version="1.0" encoding="UTF-8"?>
<sitemapindex xmlns="http://www.sitemaps.org/schemas/sitemap/0.9">
  <sitemap><loc>https://example.com/sitemap-0.xml</loc></sitemap>
  <sitemap><loc>https://example.com/sitemap-1.xml</loc></sitemap>
</sitemapindex>
robots.txt
User-agent: *
Disallow:
Sitemap: https://example.com/sitemap.xml
Submit it here
- Google Search Console → Index → Sitemaps.
- Bing Webmaster Tools → Sitemaps. Note: Bing’s “Import from GSC” often pulls sitemaps over, but not always; if the Bing UI shows none, just submit the URL manually.
- Yandex/Naver/Seznam → their sitemap forms; same URL.
Quick troubleshooting
- 404/403/301 on the sitemap URL.
- Blocked by
robots.txtor auth. - Non-canonical URLs listed (e.g.,
httpvshttps,wwwmismatch). - XML not valid / wrong content type.
Do you even need one?
Small sites (<100 pages) can rely on internal links, but for new sites or sites with media (images/video) a sitemap speeds discovery. It’s cheap insurance.

Conclusion
Search engines don’t automatically know about new websites the moment they go live—you need to give them a nudge. By registering your domain with major search engines, setting up DNS verification, and submitting a sitemap, you make it easier for crawlers to discover and index your content. Whether you use Google Search Console, Bing Webmaster Tools, or IndexNow for faster notifications, proper domain name search engine registration is a foundation of SEO. It’s a one-time setup that pays off with better visibility and faster updates whenever your site changes.